Features
Opinion
Tech
Pixel Pushing Powerhouse
January 5, 2016 By Zac Bolan
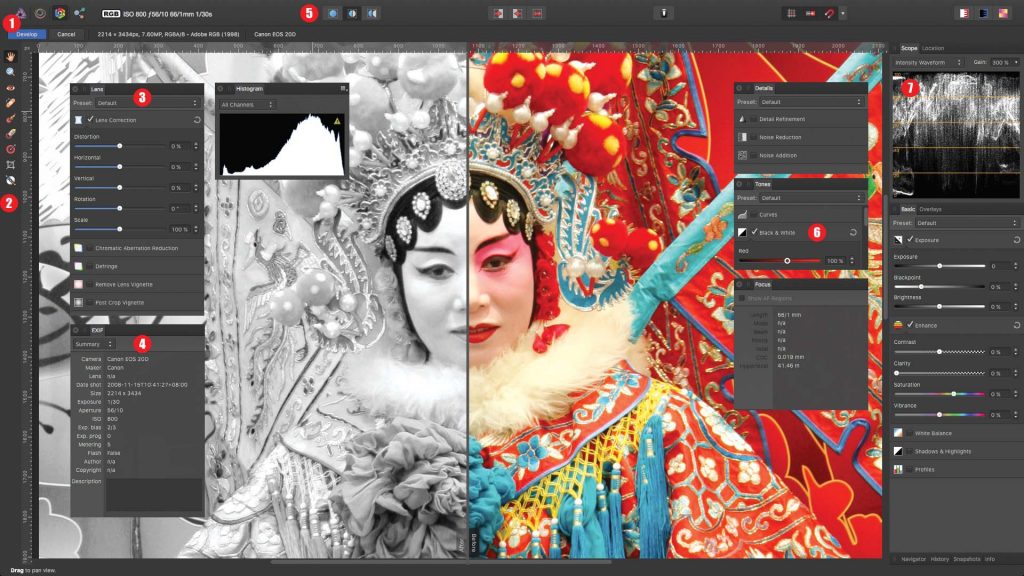 1) Users switch between Personas for varied image editing tasks. 2) A full tool dock chock full of goodies relevant to the selected Persona. 3) Develop Persona provides powerful lens correction capabilities, but no pre-installed lens profiles. 4) Full EXIF information. 5) Three view options including single window, split screen (shown), and dual images showing before and after. 6) Adjustment panels for Develop Persona functions. 7) Scope panel shows distribution of chrominance and luminance.
 An in-depth test review of Affinity Photo v1.3.5 (available from the Mac Store for $57.99 or as a free trial) to better understand if Serif Software can continue to shake up the graphics software market with its inexpensive applications.
Within a span of 12 short months, UK-based Serif Software has turned the Mac graphics software market on its ear! Its first salvo – Affinity Designer – was released in October 2014 (reviewed in PrintAction February 2015) and cut a broad swath into the design, pre-media and prepress software market with powerful and useful features aimed squarely at graphic arts professionals. And instead of exacting a monthly toll from its users, Serif chose to sell perpetual licenses of Affinity Designer through Apple’s online store for a fraction the cost of competing applications.
Now Serif is poised to disrupt the image-editing and photography market with its next product for graphics professionals and amateurs alike – Affinity Photo. As with Designer, Serif has engineered Affinity Photo as a Mac application from the first line of code instead of porting their popular PhotoPlus application from the Windows side of its business. And based on my initial impressions and early industry buzz, Affinity Photo is a strong sophomore effort for the company as it courts the Mac design, photo and graphics pro.
Personas for the people
When first launching Affinity Photo (AP) the default user interface opens in an application window and presents a familiar looking array of image-editing tools and panels that are relatively easy to navigate for both experienced image pros and amateurs. As with Designer, Affinity Photo groups tools and functions into task specific workspaces called Personas – good for those keen to organize their workflow. Initially, Photo opens with the Photo Persona active, presenting a familiar looking Tool Dock on the left chock full of the usual (image-editing) suspects including: Move Tool; Selection Brush; Cropping; various paint brush and fill tools; dodging and cloning tools; as well as a few mystery tools.
Mystery tool #1: The AP Flood Select tool enables users to select pixels by colour similarity. As you drag the tool across a range of pixels, the selection size grows to encompass a wider range of colour. Flood Select is especially useful in isolating shadow areas in high contrast images. Mystery tool #2 is the Inpainting Brush, another tool unique to AP that can be used to identify damaged areas within an image, and then used to paint over the missing data with new pixels reconstructed based on image information from the surrounding pixels. It sounds complex, but is really just a new and innovative approach to content-aware restoration.
The toolbar running horizontally along top of the Photo Persona application window houses auto levels, contrast, colour and white balance buttons in addition to selection and quick mask tools. In particular, AP’s Quick Mask feature enables users to easily build masks to isolate key elements within their images, then toggle how the selection is displayed. Other toolbar inhabitants include a nifty Force Pixel Alignment tool that will snap vector objects or pixel selections to full pixels – very useful for Web graphics – as well as a full range of arrange, insert and alignment functions.
A full range of filters can be found in the Photo Persona menubar, including the varied flavours of Blur; Sharpen; Distort; Noise; Edge Detection; Shadows/Highlights and so on. When launched each Filter pops up in its own window with all the appropriate controls and parameters for the user to adjust. Split Screen, a feature borrowed from Designer, is built into the filter window and enables users to view images in full screen, split screen or mirrored screen to preview the effect alongside the original image in real-time.
As you might expect, the right side of the default AP workspace contains a familiar set of panels relevant to the Persona that the user is working in. For example, the Photo Persona includes essential panels such as Layers; Effects; Swatches; Brushes; Histogram; Navigator; and so on. All panels can be rearranged to suit individual preferences within the application window to create a customized workspace. The chaotically minded can opt to do away with the window altogether by choosing to work in Separated Mode, which breaks all the aforementioned toolbars and panels into free-floating elements that can be placed anywhere on your screen.
Using Layers, AP provides a comprehensive non-destructive editing workflow allowing users to apply any adjustment or effect to underlying Layers. Colour images can be converted to greyscale using a B+W adjustment layer similar to a channel mixer you might find in other photo-editing applications. Unique to Affinity Photo, Live Filter Layers can be applied to any layer and modified in real-time.
Portrait photographers and prepress techs dealing with a lot of headshots will appreciate AP’s Frequency Separation filter which enables users to correct texture and colour independently – great for blemish removal and smoothing coarse skin textures without affecting skin tone.
Liquify & Develop
Affinity Photo includes three additional Personas for users: Liquify; Develop; and Export. As the name implies, Liquify Persona is the workspace for distorting pixels in images. When switching to the Liquify workspace, a grid is immediately applied to your image showing brush size and distortion effect. The Toolbar displays a selection of distortion tools, such as Twirl; Pinch; Liquify Turbulence Tool; as well as a Freeze Tool that creates a mask to protect an area in your image from distortion, and a Thaw Tool to remove it.
Opening a Camera RAW file in Affinity Photo automatically defaults to the Develop Persona – AP’s robust RAW editing workspace. In addition to RAW, the Develop Persona works with other standard image formats and Photo’s tabbed UI means that users can work with RAW images alongside other files. Develop enables users to apply multiple adjustments to images encompassing exposure; white balance; and black point along with a variety of other professional-grade adjustments. The AP Scope panel shows users the distribution of chrominance and luminance within their image – a capability I have not previously seen in an image-editing application.
I was particularly impressed with the powerful lens correction features in the AP Develop Persona, including notable noise reduction for high ISO images. That said: Affinity Photo has the ability to create and save presets for rectifying lens distortion, but this version does not appear to include profiles for specific lenses. Hopefully, some popular lens profiles will show up in a future version. When finished perfecting your RAW image, Affinity Photo prompts you to ‘Develop’ before changing Personas in a nod to the analog roots of darkroom wizardry.
The Export Persona affords users very precise control over getting an image out of Affinity Photo in a variety of formats. At this point, I should mention that AP has its own propriety file structure for saving files you are actively working with. The .afphoto file type contains all layer, filter, mask and effect information in addition to the pixels in your image. Although this format is both efficient and convenient, users will still need to export more common image formats for prepress use. Fortunately, the Export Persona makes short work of this task with all the options necessary to export SVG, JPEG, TIFF, PNG, GIF, EPS and PDF available in one convenient workspace. Interestingly, I saved the same test image in Photoshop and Affinity Photo – the Affinity Photo file was about 70 percent smaller while maintaining the same pixel density.
Under the hood
It is easy to get wrapped up in all the bells and whistles Affinity Photo provides for image-editing pros and overlook a few other pretty remarkable attributes. Under the hood, AP uses a 64-bit architecture and harnesses every graphics advantage the Mac ecosystem has to offer, such as: Support for Open GL; Grand Central Dispatch; Core Graphics; and the Retina display UI. In plain English this translates to fast, live processing and instantaneous previews of a huge range of high-end filters and effects; masking effects and advanced adjustment layers as well as live blending modes. Affinity Photo is very fast, even on modestly configured equipment such as my aging 2012 Macbook Air.
Prepress pros will be glad to hear that in addition to support for RGB, Greyscale and LAB colour spaces (both 8- and 16-bit), AP provides users with a start-to-finish CMYK workflow, something of a rarity in image-editing applications within this price range. Add to that a multi-document tabbed interface, support for unlimited layers and impressive live preview performance even when applying effects to massive layered images and its pretty tough to see a downside to working in Affinity Photo!
That’s not to suggest Affinity Photo provides everything a photographer, designer or prepress pro wants or needs. A few useful production capabilities are missing in action with this version, including support for scripts, HDR image compositing and panorama stitching. Also, minor conveniences such as the application recognizing the pixel dimensions of an image in the clipboard when creating a new file have been overlooked – in this version at least. The good in Affinity Photo’s imperfections is that Serif has fodder for future updates – something they have established a good reputation for with Affinity Designer.
Elephant in the prepress department
“Gee, Affinity Photo sounds an awful lot like Photoshop! How does it compare?” Google “Affinity Photo” and you will see “Photoshop Alternative” or “Photoshop Challenger” as the headline or opening stanza in dozens of articles. When assessing Affinity Photo, I tried to put more than two decades of Photoshop experience on the back burner and take an unbiased look at this new application instead comparing the two programs feature-by-feature. As a result, I have concluded that Affinity Photo is the first image-editing application I’ve worked with that can meet the day-to-day production needs of most designers, photographers and image-editing specialists that didn’t have an Adobe logo on its welcome screen. This application provides all tools needed to work with CMYK images with full Photoshop import (.PSD and .PSB) and export capability (.PSD) while maintaining layers and effects.
Does Affinity Photo do everything Photoshop does? Of course not! Photoshop benefits from more than 25 years of development and includes arcane features such ad-hoc video editing and 3D model rendering and printing – neither which might be relevant to many designers, premedia and prepress specialists.
And if, like myself, you have been working with Photoshop on a professional level for more than 20 years you have also likely memorized plenty of key commands and know where to access every single function with a flick of the wrist. With that level of muscle memory dedicated to working in Photoshop, you will have some re-learning to do before becoming as effective in Affinity Photo. The key takeaway here is that in most cases you can eventually be as effective once you are on the downhill side of the Affinity Photo learning curve… a pretty big accomplishment for Serif’s new kid on the image-editing block.
Zac Bolan can be reached at zbolan@mac.com
Print this page